Showing posts with label blanket. Show all posts

Saturday, February 1, 2014

Handmade Holidays 2013

I ended up not doing a whole lot of Christmas sewing this year (I had big plans, but didn't get to most of them), but there was a fair amount of knitting.  I just mailed out the last thing this week *sigh*, so I'm finally blogging about the gifts as well.

I made O's teacher some boot toppers and also gave her some coffee and coconut oil exfoliating scrub that apparently never got photographed.  It was brown and in cute jar, so just imagine that.  I was quite pleased with the boot toppers.  (Ravelry notes)  Someday I'd like to make myself a pair.  I looked on Ravelry a couple of days ago, and the last time I knitted myself anything was 2009!  I still wear that hat too.


E's teacher and para also got the scrub, along with some slippers.  I made her teacher Bea's Slippers (Ravelry notes) and loooooved how they turned out.  They took a lot longer to knit than I was expecting, though, so I had to find a quicker option for her para.


I ended up knitting double-stranded slippers for hers, and they were super quick and quite squishy.  (Ravelry notes)  She told me after the break that her kids kept swiping them from her.  Haha.


I also wanted to give a little some thing to the secretary at E's school, since I end up bugging her to sign in and out nearly every day at drop-off and pick-up time.  She had a bio up in the entrance at the beginning of the year that said she sewed, so I had that in the back of my head and decided to make her a jar pincushion and fill it with a few chocolates.  Honestly, she had one of the best reactions to a gift that I've given in a long time.  It made my day to see how happy she was that I had read her bio and remembered that she sews.


Here's my only actual sewn project!  Ray asked for a phone cozy for when he runs in the cold.  I took this tutorial and simplified it, since I knew he couldn't care less about the piecing.


O wanted to make E a blanket and decided a tie blanket would be the way to go.  He was right, she loves the fringe. He chose the fabric, I did the cutting and Ray and I both helped him tie it, but he did a significant part of it.

It looks like E's staring down that raccoon.

Back to knitting (I have no rhyme or reason to this post, I guess), my SIL requested an earflap hat for her younger son, so I made him this one.  (Ravelry notes)  This was my most shamefully late gift of this holiday season.  Winter doesn't seem to be ending anytime soon, though, so he will have plenty of opportunity to wear it still.  Hopefully it fits!


And last, but not least, the kids' annual Christmas ornaments.  (You can see 2011's here and 2012's here.)  O has been very into watching the Peanuts holiday specials, so I was inspired by this ornament on Etsy and made him Charlie Brown.  I wanted to use a glass ball like the original, but couldn't find any when I finally went shopping (I think Hobby Lobby has them, but it was a Sunday, so they were closed).  I settled for a paper mache one instead, so Charlie Brown is a little bumpier than I would have liked, but O didn't seem to care.


E's ornament was again based on her Halloween costume (as well as her on-going love of our cat).  It ended up being a huge pain to knit and then sew up this fun fur yarn, but I do like how it turned out.  (Ravelry notes)  I used scrapbooking stickers to put her name (blurred out, obviously) and the year on the ornament the cat is holding.  Stickers are the way to go.  Much less stressful than trying to paint the name and year with a shaky hand like I did on O's!


And that's it!  I felt really busy, but I guess I didn't really accomplish much.  Now I'm on to working on birthday gifts, since we have several in our family in February.  Winter KCW was this week, but I didn't even make an attempt this round.  I have been enjoying looking at what other people have been making, though! Have you been sewing along?

Saturday, February 16, 2013

"Fun" with Cuddle Fleece

I have such a love/hate relationship with cuddle fleece.  It's so awesomely soft and everyone loves it, but it's also such a pain to work with it.  It stretches like crazy and sheds ridiculously.  I can't even tell you how many times in the last couple of months that I've run out to pick a kid up from school only to realize I was still covered in fuzz!

I gave my oldest nephew an IOU for his main Christmas present, suggesting a t-shirt quilt or convertible mitts in his school colors as possibilities, but he immediately asked for a blanket made out of cuddle fleece like his brother's.  I had learned my lesson about the mitered corner version and just did a simple turned and topstiched finish this time.  It was tricky keeping it lined up --and the green was somehow 4" wider from selvage to selvage?! -- and it seemed to stretch out of shape badly when I sewed it, but after washing and drying, I think it popped back for the most part.


When I was at Joann's picking up the green and navy fabrics, I also spotted some in a cute popcorn print.  I had pretty much sworn off cuddle fleece by this point, but O's class fundraiser basket was going to be a movie night theme, which his teacher told me was inspired by our holiday gift. I emailed her a pic and asked what she thought about a throw blanket.  She loved the idea, so back I went.  I decided to try rounding the corners and binding the single layer with double-fold fleece binding this time.


I don't think this ended up any easier or cheaper, but I do like how it looks.  Well, except for the one corner that got stretched out and won't lay flat even after a trip through the washer.  Hopefully whoever wins the basket won't look at it too closely.  It's still nice and snuggly, and his teacher thought it was really cool.


Hopefully it will inspire some extra bids!

Monday, January 21, 2013

Handmade Holidays: All the Rest

So I had big plans for blogging the holiday crafting in a timely manner with nicely categorized posts. It started off well, but then I started reading the A Song of Ice and Fire series and more or less stopped being productive entirely.  A friend sent me the first four books a couple of months ago, and I smartly decided not to start them until after I'd finished my gift-making, but I probably should've held out until I'd both blogged everything and cleaned up my ginormous mess in the sewing room.  I haven't picked up the final book from the library yet, so I'm taking this opportunity to catch up in one big blog post.  I've made a good dent in the cleaning department today too, as I mentioned on Facebook.  Tomorrow, back to reading!

E's most time-consuming gift was a stroller blanket bag thing.  Technical term for sure.  We've been using a Papooska (which seems to be defunct now, unfortunately) on our walks to school and back, but it was getting too short for her.  I basically just enlarged the Papooska, adding about 4" to the width and a foot or so to the length, so it should work for several years.

Snug as a bug

The original had a nylon outer, but I used some lightweight Windpro (I think) stash fabric along with fleece lining like the Papooska.  It's heavier and seems warmer, but the one drawback is that it's considerably bulkier.


Like the original, I used reflective tape -- although I wish I'd either have moved it down a few inches or added another stripe -- and used buttonhole elastic to cinch it up.  The buttonhole elastic goes down along the sides below the buckles and through a channel on the top of the back part.


There's also some elastic that gathers the bottom and loosely gathers the upper between the buckles.  In hindsight, I'm not sure either of those is necessary.

Other than fabric selection and enlarging it, the only other change I made was to use adjustable buckles rather than snaps.

That's her owl bag peeking out from the bottom of her stroller.
It took waaaaay longer than I thought it would, but I'm really happy with how it turned out.  Since we walk to school pretty much every day -- unless it's below 0F with the windchill like today -- it will get a lot of use.

I made a couple of other blankets also.  For one of my nephews, this one is made from cuddle fleece with a Lego-esque applique, minus the yellow.  The font is Legothick.


I tried to make it the same way as the kindergarten quilts, but since that method requires precision, ironing, and a lot of marking, and cuddle fleece doesn't really allow for any of those things, it didn't go well.  One of the corners is extremely wonky.  Fortunately, my nephew loved how soft is is and wasn't bothered by its issues.


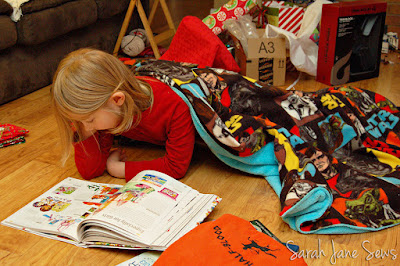
I made O a fleece blanket also.  His was Star Wars fleece on one side and blue cuddle fleece on the other, turned and topstitched, which worked much better with the super-stretchy cuddle fleece.

Christmas morning action shot

Also sneaking into the above picture was the Camp Half-Blood shirt (from the Percy Jackson books) I made for him with a freezer paper stencil.  I'll be sharing more about this one next month as part of Heron's Crafts Storybook Craft Project Series.


For my younger niece, a quick headband from Heather Bailey's Hooray for Headbands (opens a PDF).  This was a fun little pattern.  I think there will be more of these in my sewing future!


Ray participated in a Secret Santa exchange at work.  One of the days, he gave her this ribbon bookmark.  He chose the ribbon, beads and charms; I just  had to put it together.


I also made Ray some Green Pepper Glove-itts like O's in some blindingly bright lime fleece, thinking he might wear them running on really cold days.  He's been wearing them to work, though, instead.  Even better!


I also made the Green Pepper Tuck-Away Balaclava hat, without the balaclava part. I'm not sure if I miscalculated or the sizing is off, but it's way too big, so I still need to decide how I want to fix that one.


And that is finally it for Christmas sewing (okay, there's one more thing I still have to make for my oldest nephew, but that's it for the completed gifts).  I have a few things that need to be sewn up soon, but I probably won't blog again until I've finished A Dance with Dragons.  ;)

Sunday, June 12, 2011

Kindergarten Quilts

If anyone ever asks you to make 23 of something, I'd strongly urge you to say no.  I, however, tend to say yes, which is how I ended up sewing a quilt for each kid in O's kindergarten class.  I suppose they're technically blankets, since they aren't pieced, but his teacher called them quilts, so I am too.  :)


Each kid sent in a yard of muslin, a yard and a half of a printed fabric, and some fusible web.  Some of the parent volunteers cut off several inches of the print fabric, ironed it onto the web and cut out the letters of each child's name.  I took the rest home and sewed up the blankets.  I wanted them to have mitered corners and thought this self-binding blanket method would be fastest. I also referenced this tutorial.  For some reason, I thought that since it was basically a bunch of straight lines, it would go pretty quickly.  While the sewing itself was pretty fast, the ironing, measuring and pinning was really time consuming.  It pretty much occupied every free moment for nine days of my life.  I was a woman obsessed.


It was fun to see the fabrics that all the kids picked.  See the one that's just solid blue?  Yeah, that's O's.  He said he wanted blue because "it's the color of water Pokemon, oceans that pirate ships sail on, and the color of my eyes."  Obviously. 


I was really happy with how they turned out overall, although the first few aren't as nice as the ones later on.  I made O's first, and only cut his main fabric 2.5" wider than the muslin.  I thought the border would look better wider, so the rest were 4".  


After the quilts were sewn, some of the other parents ironed on the letters of each child's name.  The kids used fabric crayons to draw pictures about what they learned this year, and his teacher ironed on those.  They each got to take home their quilt on the last day of school.  I didn't take pictures of O's finished blanket until after he'd slept with it, so it's pretty wrinkled, but you get the idea.  


After sewing 23 of these, here are my tips for neatly mitered corners using the self-binding technique linked above.  First, measure carefully.  Second, iron, iron, iron!  Third, take your time sewing the corners.  It's worth it to putz a bit to make sure they end up without puckers.  I took some pics of the process.
  
Mark the 1/4" seam allowance on each corner.


When sewing, try to stop exactly at the intersection of the two lines.  
Futz around as much as necessary to make this happen!


The seams should meet perfectly.


This will make it easier to fold the corners with the two side seams on top of each other.  Then mark your line for the miter starting exactly where the two seams meet.

Sew carefully so that all three seams intersect in the same spot.  


Once it's trimmed, ironed, turned, ironed some more, pinned and top-stitched (gee, I wonder why these took so long?!), you have a perfectly flat mitered corner.  

AddThis

Related Posts Plugin for WordPress, Blogger...