Showing posts with label stencil. Show all posts

Wednesday, May 7, 2014

The Birthday Shirt: Lego Hero Factory Splitface Tee [with Template]

Today is O's ninth birthday!  Most years one of his presents is a special tee (earlier shirts: age 5, 7, 8), often one that he designs himself.  We've been talking about this year's for quite a while.  His first idea was a half gunmetal grey, half red shirt, a la the Lego Hero Factory character Splitface.  Easy enough.  Then he showed me the chest plate piece and I said, "Oh, why don't we freezer paper stencil on the design? That would be cool!"  He quickly agreed.  On the one hand, I didn't need to sew a shirt (although I did hem the sleeves of a long-sleeved tee to get one in the right color).  On the other hand, I didn't look closely enough at the piece.  It is super detailed!  I could have simplified it, but O is a detail guy, so I knew he'd appreciate it if I made it as accurate as possible.  I would not necessarily recommend that you try to replicate this in one day or cutting by hand with an x-acto knife.  But that's what I did.


I started by taking a photo of the chest plate using a macro filter.  Then I used this tutorial (more or less) to make a stencil in Photoshop.  I decided to stencil the black outlines and fill in the rest with a paintbrush.  I'm sure there are simpler ways to do this, and you could definitely leave out more of the details and still get the general idea, but that's what I thought would work best for how we wanted it to look.  We decided to leave out the part below the belt.

Cutting took around 2 1/2 hours, even leaving out some of the smallest details.  My tips for such intricate freezer paper stencils (other than giving yourself a lot more time than I did) are to: 
  • Print out a copy on regular paper to use as a map of sorts to keep track of the pieces as you cut.
  • Keep the map and pieces on a tray so nothing gets lost.  I used a jelly roll pan.
  • A hole punch works great for the tiny circles.
  • Have a tweezers handy! 

After all that time cutting, I was pretty worried I would screw it up, but the outline turned out great.  Then I used a small -- very small -- paint brush to fill in the red and silver.   You could also cut the stencil so that you're painting the silver and red parts and then add the outline after.  It would be easier cutting for sure, but I wanted the placement of all the black elements to be exact.  Yes, I may have a problem.  The painting was actually really fun.  If I had spread this project out over a few days, I would have enjoyed it a lot.  It was cool to see it all come together.  O was home by the time I was painting, and he was really encouraging about how it was looking.  That was pretty adorable.


He went to bed before I had finished the silver, though, so the final product reveal this morning.  He was thrilled, which made the many hours so worth it.  We both agreed that the image could have been a bit larger, but that it looks good anyway.


He commented many times on how accurate all the details were and how I had only left out a few tiny things.  He said something like, "Anyone who knows Lego Hero Factory would know right away that this is Splitface's chest plate!"  Haha.  I think that's a small target audience, especially since it's a discontinued model, but I'm so happy that he loves it.


I can't imagine there are a lot of people out there who want a Splitface shirt and would like to put several hours into making one, but since I made the stencil template, I put it up here.  If anyone DOES make one, I'd love to see it!

Happy Birthday, O!

Friday, May 31, 2013

O's Birthday Tee: USS Constitution Style [with Template]

Originally guest posted at Once Upon a Sewing Machine as part of their Sew You Had a Boy series.

Most years I make O a birthday shirt.  Last year he even designed his own outfit!  His 8th birthday is next week, but he didn't have any suggestions this time around.

We recently went on a trip to Boston, and one of O's favorite things was a tour of the USS Constitution, so I used that as my inspiration.


My original plan was to somehow applique or stencil the ship onto the front of a tee, but fortunately I realized that simplicity is a virtue and a life preserver would be less likely to make me want to tear my hair out.

For the shirt itself, I chose the Fishstick Designs Patrick Curved Raglan, which I have sewn more than any other pattern.  It is definitely one of my go-to boy patterns!


The life preserver is a combination of raw-edge applique and freezer paper stencil.  I sewed the left side seam, then placed and sewed the applique before sewing up the other side.


I'm really happy with how it turned out, so I hope O likes it too!  If you'd like to make one for your own little history lover, you can download the applique and stencil template here.


Sunday, March 10, 2013

Tutorial: Camp Half-Blood Freezer Paper Stenciled Tee

Originally posted last month on Heron's Crafts as part of her Storybook Craft Project series.

About a year ago, my teenage niece suggested that O and I should read the Percy Jackson books.  We share a love of Harry Potter, so she thought we'd enjoy them -- and she was right!  O has been pretty much obsessed with all of Riordan's books ever since.  I made him a Camp Half-Blood tee for Christmas and my niece loved it, so I took this opportunity to make one for her as well.


Materials
Orange tee
Black  fabric paint
X-acto knife
Freezer paper
Template


If you're new to freezer paper stenciling, start by reading through Rebecca's tutorial.

Open the text template and add whatever clip art you'd like, or make a separate stencil for the image. I chose a centaur, but other suggestions would include a pegasus,  Poseidon's trident, Athena's owl, Zeus's thunderbolt, or the symbol of another Greek god.  I used the Adonais font for the text, if you'd like to make your own stencil with a different layout.

Print and carefully cut out the stencil with the X-acto knife, making sure to keep track of the tiny negative space pieces. I didn't realize until I made this one that I'd forgotten the piece that separates the centaur's arm and arrow on O's shirt.  Apparently not a big deal, since I didn't notice for over a month!


Center the stencil, iron it on, and paint.


The black covers well, so it only needed one coat in most areas.  When you're satisfied with the coverage, peel off the stencil.  It helps to use a pin and a tweezers to get the itty-bitty pieces off.


Admire your work.  All that detailed cutting seems worth it now, right?  Follow the paint instructions for drying and finishing, and enjoy your new shirt.


Friday, February 15, 2013

Monday, January 21, 2013

Handmade Holidays: All the Rest

So I had big plans for blogging the holiday crafting in a timely manner with nicely categorized posts. It started off well, but then I started reading the A Song of Ice and Fire series and more or less stopped being productive entirely.  A friend sent me the first four books a couple of months ago, and I smartly decided not to start them until after I'd finished my gift-making, but I probably should've held out until I'd both blogged everything and cleaned up my ginormous mess in the sewing room.  I haven't picked up the final book from the library yet, so I'm taking this opportunity to catch up in one big blog post.  I've made a good dent in the cleaning department today too, as I mentioned on Facebook.  Tomorrow, back to reading!

E's most time-consuming gift was a stroller blanket bag thing.  Technical term for sure.  We've been using a Papooska (which seems to be defunct now, unfortunately) on our walks to school and back, but it was getting too short for her.  I basically just enlarged the Papooska, adding about 4" to the width and a foot or so to the length, so it should work for several years.

Snug as a bug

The original had a nylon outer, but I used some lightweight Windpro (I think) stash fabric along with fleece lining like the Papooska.  It's heavier and seems warmer, but the one drawback is that it's considerably bulkier.


Like the original, I used reflective tape -- although I wish I'd either have moved it down a few inches or added another stripe -- and used buttonhole elastic to cinch it up.  The buttonhole elastic goes down along the sides below the buckles and through a channel on the top of the back part.


There's also some elastic that gathers the bottom and loosely gathers the upper between the buckles.  In hindsight, I'm not sure either of those is necessary.

Other than fabric selection and enlarging it, the only other change I made was to use adjustable buckles rather than snaps.

That's her owl bag peeking out from the bottom of her stroller.
It took waaaaay longer than I thought it would, but I'm really happy with how it turned out.  Since we walk to school pretty much every day -- unless it's below 0F with the windchill like today -- it will get a lot of use.

I made a couple of other blankets also.  For one of my nephews, this one is made from cuddle fleece with a Lego-esque applique, minus the yellow.  The font is Legothick.


I tried to make it the same way as the kindergarten quilts, but since that method requires precision, ironing, and a lot of marking, and cuddle fleece doesn't really allow for any of those things, it didn't go well.  One of the corners is extremely wonky.  Fortunately, my nephew loved how soft is is and wasn't bothered by its issues.


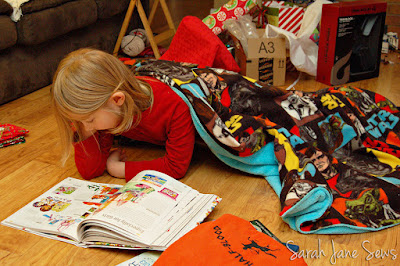
I made O a fleece blanket also.  His was Star Wars fleece on one side and blue cuddle fleece on the other, turned and topstitched, which worked much better with the super-stretchy cuddle fleece.

Christmas morning action shot

Also sneaking into the above picture was the Camp Half-Blood shirt (from the Percy Jackson books) I made for him with a freezer paper stencil.  I'll be sharing more about this one next month as part of Heron's Crafts Storybook Craft Project Series.


For my younger niece, a quick headband from Heather Bailey's Hooray for Headbands (opens a PDF).  This was a fun little pattern.  I think there will be more of these in my sewing future!


Ray participated in a Secret Santa exchange at work.  One of the days, he gave her this ribbon bookmark.  He chose the ribbon, beads and charms; I just  had to put it together.


I also made Ray some Green Pepper Glove-itts like O's in some blindingly bright lime fleece, thinking he might wear them running on really cold days.  He's been wearing them to work, though, instead.  Even better!


I also made the Green Pepper Tuck-Away Balaclava hat, without the balaclava part. I'm not sure if I miscalculated or the sizing is off, but it's way too big, so I still need to decide how I want to fix that one.


And that is finally it for Christmas sewing (okay, there's one more thing I still have to make for my oldest nephew, but that's it for the completed gifts).  I have a few things that need to be sewn up soon, but I probably won't blog again until I've finished A Dance with Dragons.  ;)

Sunday, April 29, 2012

KCWC Day 7: Retro Captain Rex Tee

It turns out O had very specific plans about his tee.  Not just any clone trooper helmet would do, it had to be Captain Rex's, and he wanted to be able to wear it to his Star Wars birthday party next week.  I was thrilled.  He's so picky about his clothes being plain, I'd thought our days of special outfits for birthdays were long over!

Captain Rex's helmet has blue accents, and in my stash there are a few yards of super soft heathered blue knit that has a great vintage feel to it, just calling out be made into a ringer tee.  Yes, another one. This time I used the Fishsticks Designs Charlie Tee pattern in size 6.

This was my first freezer paper stencil attempt and I'm pretty happy with how it turned out.  There were a few spots I was going to touch up, but I was instructed to leave them, as Rex's helmet is scuffed up and stuff from battle.  My mistakes make it more authentic, I guess.

 
O usually loses interest in sewing projects soon after we finish the design process, but this time he was all over it.  I think the paint was a big factor, and perhaps some fear that I might screw up his beloved Captain Rex.  Ha.


I think the helmet could've been placed a bit higher, but O still said it turned out even better than he'd imagined.

And that's it for me for KCWC!  In each of the three previous challenges, I've sewn three things, so I'm excited that I managed four this time, especially considering how busy this week was.  A big thanks to Meg of Elsie Marley for hosting KCWC.  It's such a great motivator, especially seeing what everyone else is making in the Flickr pool.

AddThis

Related Posts Plugin for WordPress, Blogger...