While E's sitting skills have improved dramatically in the past couple of years, she's still not reliable enough that she can sit at the table unrestrained. I suspect that would be a head injury waiting to happen. At home she uses a booster seat and at restaurants we usually just take her in her adaptive stroller. Most people's houses, though, aren't handicapped-accessible (ours included so far), so we tend to run into issues when we're visiting people at mealtimes and forget to bring along the booster seat. We're usually about an hour down the road before one of us realizes it's still strapped to her chair at the table. We also run into space issues when we're taking longer trips. We are continually putting off the purchase of a minivan, although that day is coming soon. I saw a few tutorials for fabric high chairs and thought that would be the answer to our various seating and bulk issues, but I wasn't 100% sold on the design of any of them.
Enter the Sew Baby Travel High Chair pattern, which I happened to see at Joann Fabrics a couple of weeks ago. While it's more of a fabric-hog than some of the tutorials, I also thought it would work out better for E. I dug out some ancient stash fabric -- I remember buying this when O. was a baby with the intention of making a pouch sling, but never got around to it. (Believe me, there was no shortage of baby carriers around here, so that wasn't a big loss. I made at least three other pouches, not to mention mei tais and ring slings. I was a bit of a babywearing hoarder.) I think it's a stretch twill.
Cutting out the pattern piece, fabric, and batting may have taken longer than sewing it up. The only change I made was to use 1.5" hook & loop left over from my cloth diaper making days instead of the recommended 3/4".
I'm quite happy with how it turned out. It's sized for up to 2T, but E is skinny and can still wear 2T pants as capris, so I decided to just go with it as-is. She has some growing room, but it would be quite easy to size up for a larger child who needs positioning help.
It folds up even smaller than I'd hoped and fits easily in the side pocket of the Thirty-one bag that we usually use for her things.
Something like this has been on my to-sew list for about a year, so I'm pretty psyched to finally be able to cross it off!
Showing posts with label special needs sewing. Show all posts
Monday, March 3, 2014
Monday, January 21, 2013
Handmade Holidays: All the Rest
So I had big plans for blogging the holiday crafting in a timely manner with nicely categorized posts. It started off well, but then I started reading the A Song of Ice and Fire series and more or less stopped being productive entirely. A friend sent me the first four books a couple of months ago, and I smartly decided not to start them until after I'd finished my gift-making, but I probably should've held out until I'd both blogged everything and cleaned up my ginormous mess in the sewing room. I haven't picked up the final book from the library yet, so I'm taking this opportunity to catch up in one big blog post. I've made a good dent in the cleaning department today too, as I mentioned on Facebook. Tomorrow, back to reading!
E's most time-consuming gift was a stroller blanket bag thing. Technical term for sure. We've been using a Papooska (which seems to be defunct now, unfortunately) on our walks to school and back, but it was getting too short for her. I basically just enlarged the Papooska, adding about 4" to the width and a foot or so to the length, so it should work for several years.
The original had a nylon outer, but I used some lightweight Windpro (I think) stash fabric along with fleece lining like the Papooska. It's heavier and seems warmer, but the one drawback is that it's considerably bulkier.
There's also some elastic that gathers the bottom and loosely gathers the upper between the buckles. In hindsight, I'm not sure either of those is necessary.
Other than fabric selection and enlarging it, the only other change I made was to use adjustable buckles rather than snaps.
It took waaaaay longer than I thought it would, but I'm really happy with how it turned out. Since we walk to school pretty much every day -- unless it's below 0F with the windchill like today -- it will get a lot of use.
I made a couple of other blankets also. For one of my nephews, this one is made from cuddle fleece with a Lego-esque applique, minus the yellow. The font is Legothick.
I tried to make it the same way as the kindergarten quilts, but since that method requires precision, ironing, and a lot of marking, and cuddle fleece doesn't really allow for any of those things, it didn't go well. One of the corners is extremely wonky. Fortunately, my nephew loved how soft is is and wasn't bothered by its issues.
I made O a fleece blanket also. His was Star Wars fleece on one side and blue cuddle fleece on the other, turned and topstitched, which worked much better with the super-stretchy cuddle fleece.
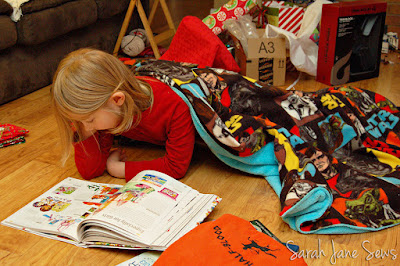
Also sneaking into the above picture was the Camp Half-Blood shirt (from the Percy Jackson books) I made for him with a freezer paper stencil. I'll be sharing more about this one next month as part of Heron's Crafts Storybook Craft Project Series.
For my younger niece, a quick headband from Heather Bailey's Hooray for Headbands (opens a PDF). This was a fun little pattern. I think there will be more of these in my sewing future!
Ray participated in a Secret Santa exchange at work. One of the days, he gave her this ribbon bookmark. He chose the ribbon, beads and charms; I just had to put it together.
I also made Ray some Green Pepper Glove-itts like O's in some blindingly bright lime fleece, thinking he might wear them running on really cold days. He's been wearing them to work, though, instead. Even better!
I also made the Green Pepper Tuck-Away Balaclava hat, without the balaclava part. I'm not sure if I miscalculated or the sizing is off, but it's way too big, so I still need to decide how I want to fix that one.
And that is finally it for Christmas sewing (okay, there's one more thing I still have to make for my oldest nephew, but that's it for the completed gifts). I have a few things that need to be sewn up soon, but I probably won't blog again until I've finished A Dance with Dragons. ;)
E's most time-consuming gift was a stroller blanket bag thing. Technical term for sure. We've been using a Papooska (which seems to be defunct now, unfortunately) on our walks to school and back, but it was getting too short for her. I basically just enlarged the Papooska, adding about 4" to the width and a foot or so to the length, so it should work for several years.
![]() |
| Snug as a bug |
The original had a nylon outer, but I used some lightweight Windpro (I think) stash fabric along with fleece lining like the Papooska. It's heavier and seems warmer, but the one drawback is that it's considerably bulkier.
Like the original, I used reflective tape -- although I wish I'd either have moved it down a few inches or added another stripe -- and used buttonhole elastic to cinch it up. The buttonhole elastic goes down along the sides below the buckles and through a channel on the top of the back part.
There's also some elastic that gathers the bottom and loosely gathers the upper between the buckles. In hindsight, I'm not sure either of those is necessary.
Other than fabric selection and enlarging it, the only other change I made was to use adjustable buckles rather than snaps.
![]() |
| That's her owl bag peeking out from the bottom of her stroller. |
I made a couple of other blankets also. For one of my nephews, this one is made from cuddle fleece with a Lego-esque applique, minus the yellow. The font is Legothick.
I tried to make it the same way as the kindergarten quilts, but since that method requires precision, ironing, and a lot of marking, and cuddle fleece doesn't really allow for any of those things, it didn't go well. One of the corners is extremely wonky. Fortunately, my nephew loved how soft is is and wasn't bothered by its issues.
I made O a fleece blanket also. His was Star Wars fleece on one side and blue cuddle fleece on the other, turned and topstitched, which worked much better with the super-stretchy cuddle fleece.
![]() |
| Christmas morning action shot |
Also sneaking into the above picture was the Camp Half-Blood shirt (from the Percy Jackson books) I made for him with a freezer paper stencil. I'll be sharing more about this one next month as part of Heron's Crafts Storybook Craft Project Series.
For my younger niece, a quick headband from Heather Bailey's Hooray for Headbands (opens a PDF). This was a fun little pattern. I think there will be more of these in my sewing future!
Ray participated in a Secret Santa exchange at work. One of the days, he gave her this ribbon bookmark. He chose the ribbon, beads and charms; I just had to put it together.
I also made Ray some Green Pepper Glove-itts like O's in some blindingly bright lime fleece, thinking he might wear them running on really cold days. He's been wearing them to work, though, instead. Even better!
I also made the Green Pepper Tuck-Away Balaclava hat, without the balaclava part. I'm not sure if I miscalculated or the sizing is off, but it's way too big, so I still need to decide how I want to fix that one.
And that is finally it for Christmas sewing (okay, there's one more thing I still have to make for my oldest nephew, but that's it for the completed gifts). I have a few things that need to be sewn up soon, but I probably won't blog again until I've finished A Dance with Dragons. ;)
Labels:
blanket
,
bookmark
,
fleece
,
gift
,
handmade holidays
,
hat
,
headband
,
mittens
,
Percy Jackson
,
special needs sewing
,
stencil
,
stroller blanket
Wednesday, October 10, 2012
KCWC Day 2: Owl Shoes (with a tutorial for altering a soft shoes pattern for use with braces)
I did sew on Day 1 (Monday), but it's a gift and the mama of the recipient is a reader, so I'm waiting to blog until she gets it.
Yesterday E got her new braces, so she also needed new shoes to fit them. I was going to just make a quick plain pair, but then I got sidetracked by the idea of an owl applique. You know how these things go. The applique took longer than the shoe construction. Ha.
I took a few pictures along the way, thinking there may be someone else out there who might need to make something similar. E doesn't wear them outside, so she really just needs a lightweight non-skid covering for her braces. A soft-soled shoe is perfect, but the braces add considerable bulk, necessitating some pattern alterations.
You will need a basic soft-soled shoe pattern. I use the Darling Diapers Minimoc pattern (scroll to the bottom left of this page). You will also need some sort of non-slip sole material. I like Toughtek, which is a rubberized material that is durable but easy to sew. I found some on Etsy when E got her first pair of braces.
Trace one of the braces and add a 1/4" seam allowance or whatever your pattern requires. If the braces are different lengths, you will need to trace each one; otherwise just remember to flip the pattern piece over when you are cutting the soles so you'll have a left and a right piece. Soft shoe patterns are often the same for both feet, but I like the snugger fit that you get from making a left and a right shoe.
Compare your new sole piece to the sole pieces provided. E's was close to the size 2 (she has tiny feet!). Trace the comparable toe piece pattern onto Easy Pattern or some other material that is easy to manipulate. You will need to adjust the toe piece for the added bulk of the braces, creating additional volume in the toe box. Cut directly down the center of the piece to the tip of the toe. Now drape this over one of the braces. One of E's has a 1 cm lift, so that was the brace that I used. Making sure to take the seam allowance into consideration, measure how far apart the middle cut edges are. I needed 2.5" of additional room.
Retrace a new pattern piece with your old piece spread as much as your measurement. You may also need to smooth out the curve on toe edge a bit (not pictured). Transfer any markings.
You can see how much wider my new pattern piece is compared to the original.
If one has a lift, you may want to add some additional height to the heel piece also. I just sized up one size.
Now that you have your pieces, you can add any embellishments and follow the sewing instructions as normal.
There is hidden elastic on this pair, but on her old ones, I used elastic cord and a toggle. This was handy both for getting them on easily and for tightening up the one that was less bulky, since I made the both to fit the larger brace. If these don't say on as well, I will switch out the elastic for some cord and a toggle also.
Yesterday E got her new braces, so she also needed new shoes to fit them. I was going to just make a quick plain pair, but then I got sidetracked by the idea of an owl applique. You know how these things go. The applique took longer than the shoe construction. Ha.
I took a few pictures along the way, thinking there may be someone else out there who might need to make something similar. E doesn't wear them outside, so she really just needs a lightweight non-skid covering for her braces. A soft-soled shoe is perfect, but the braces add considerable bulk, necessitating some pattern alterations.
You will need a basic soft-soled shoe pattern. I use the Darling Diapers Minimoc pattern (scroll to the bottom left of this page). You will also need some sort of non-slip sole material. I like Toughtek, which is a rubberized material that is durable but easy to sew. I found some on Etsy when E got her first pair of braces.
Trace one of the braces and add a 1/4" seam allowance or whatever your pattern requires. If the braces are different lengths, you will need to trace each one; otherwise just remember to flip the pattern piece over when you are cutting the soles so you'll have a left and a right piece. Soft shoe patterns are often the same for both feet, but I like the snugger fit that you get from making a left and a right shoe.
Compare your new sole piece to the sole pieces provided. E's was close to the size 2 (she has tiny feet!). Trace the comparable toe piece pattern onto Easy Pattern or some other material that is easy to manipulate. You will need to adjust the toe piece for the added bulk of the braces, creating additional volume in the toe box. Cut directly down the center of the piece to the tip of the toe. Now drape this over one of the braces. One of E's has a 1 cm lift, so that was the brace that I used. Making sure to take the seam allowance into consideration, measure how far apart the middle cut edges are. I needed 2.5" of additional room.
![]() | |
| My measurement was across the strap with the bees. |
Retrace a new pattern piece with your old piece spread as much as your measurement. You may also need to smooth out the curve on toe edge a bit (not pictured). Transfer any markings.
You can see how much wider my new pattern piece is compared to the original.
If one has a lift, you may want to add some additional height to the heel piece also. I just sized up one size.
Now that you have your pieces, you can add any embellishments and follow the sewing instructions as normal.
![]() |
| The brace on the right is the one with the lift. |
There is hidden elastic on this pair, but on her old ones, I used elastic cord and a toggle. This was handy both for getting them on easily and for tightening up the one that was less bulky, since I made the both to fit the larger brace. If these don't say on as well, I will switch out the elastic for some cord and a toggle also.
![]() |
| The originals |
![]() |
| Trying them out in her walker this morning. |
Labels:
KCWC
,
shoes
,
special needs sewing
,
tutorial
Subscribe to:
Posts
(
Atom
)